


A Reclaimed Order Block in the ICT trading style initially functions as an Order Block but guides the subsequent price movement after a price break and returns to it.
Market Makers accumulate liquidity in this area, and the price reacts to the return, setting a new direction. This reclaimed structure indicates a revival of smart money order flow and marks the point from which a new market move begins.
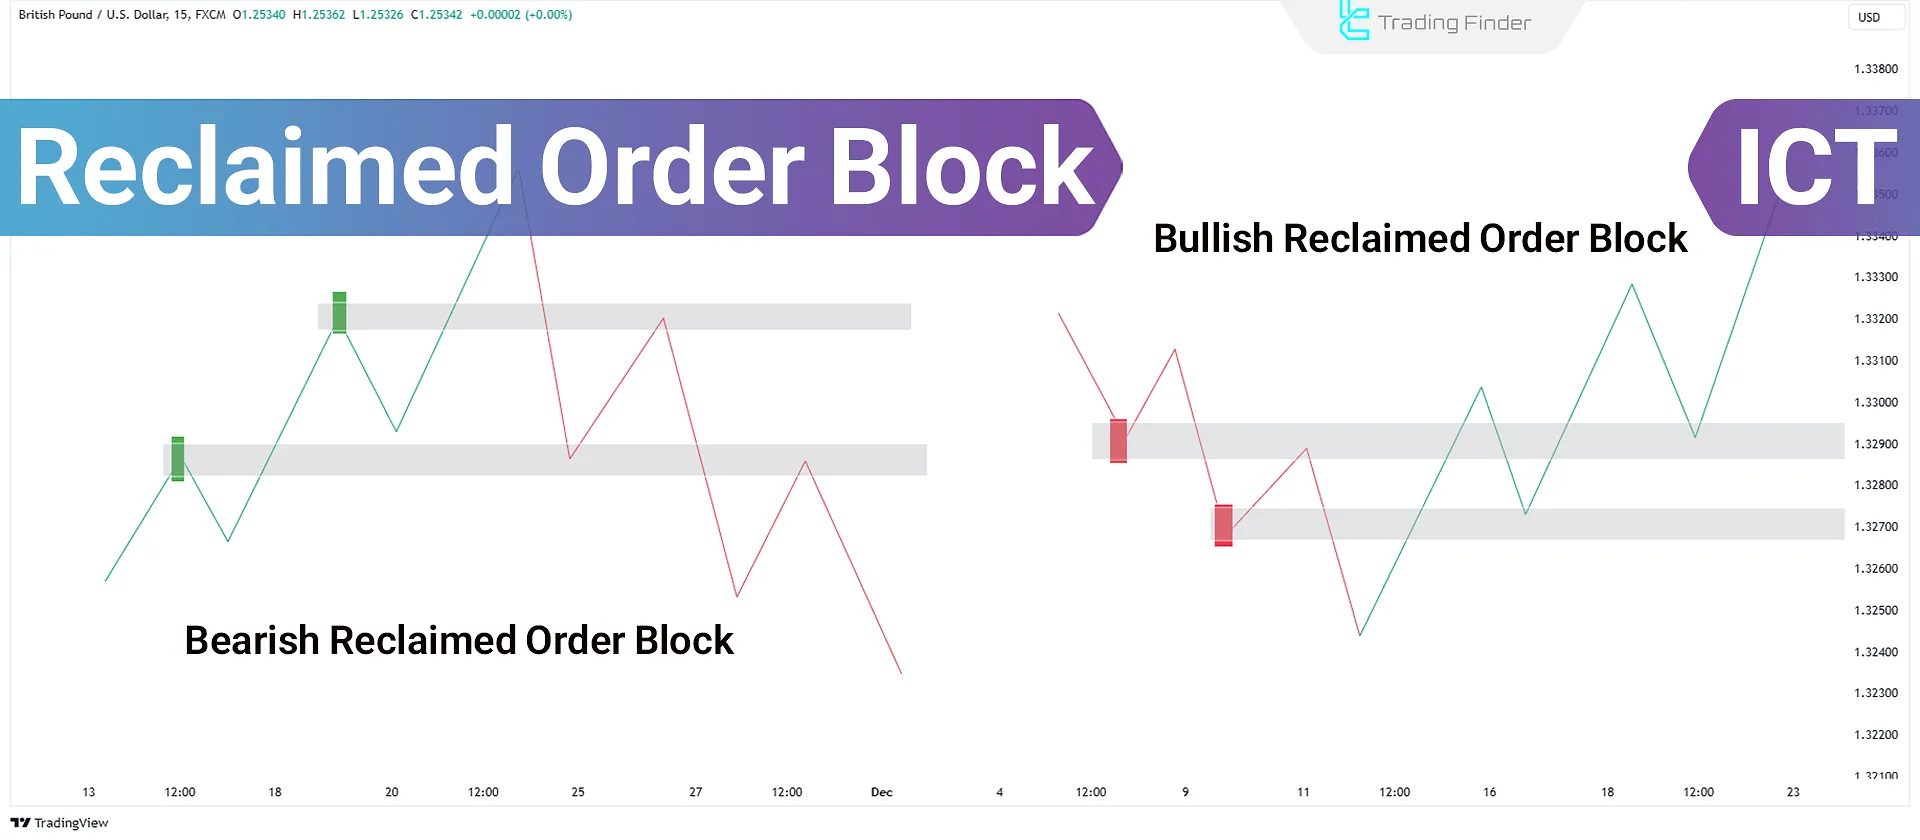
What is a Reclaimed Order Block?
Reclaimed Order Blocks are key market zones where professional and Institutional traders accumulate buy or sell orders.
These areas often experience minor price movements (Displacements) and regain importance as they act as support or resistance, driving prices upward or downward.
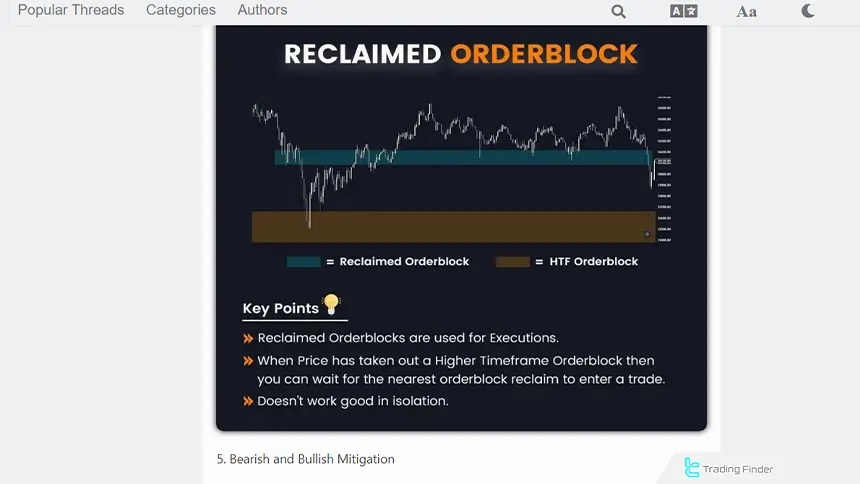
Visual tutorial of the reclaimed order block from the Rattibha website:
Difference Between a Reclaimed Order Block and an Order Block
In the ICT style, a regular order block and a reclaimed order block are two structural zones with different applications in liquidity flow and market maker behavior; the regular block is the origin of the move and the source of initial orders.
While the reclaimed order block becomes active after a liquidity sweep and price reclaim, offering a more refined structure. Table of differences between a regular order block and a reclaimed order block:
Comparison Parameter | Regular Order Block | Reclaimed Order Block |
Operational definition | The last opposing candle before a strong move; the zone where initial smart money orders are placed | A block reactivated after price breaks and returns; a zone with a revived structure |
Structural role | Origin of the main move and point of imbalance creation | Area where orders are revived after liquidity absorption and a change in structural behavior |
Relation to liquidity | Formed before liquidity is taken | Activated after a liquidity sweep and liquidity engineering |
Formation context | Early stage of the move; after BOS or in volume areas | Observed after the initial OB is broken and price returns for reactivation |
Type of price reaction | Fast initial reaction; possibility of non-continuation | Refined and targeted reaction; valid behavior due to liquidity confirmation |
Degree of validity | Medium to high validity depending on confirmations | High validity; price displacement, liquidity collection, and zone reclaim |
Use in ICT | Identifying the origin of the move and initial order placement | Identifying the zone reused by the market maker after a liquidity sweep |
Key signals | Opposing candle, BOS, imbalance | Liquidity sweep, close above/below the OB, return |
Behavior before activation | No need for a secondary return | Requires zone break, liquidity take, and reclaim |
Suitable for entry | Early entries at the start of the trend | Confirmation-based entries with a higher probability of success |
Stop-loss | Behind the OB zone | Behind the reclaim level and below/above the swept low or high |
Reclaimed Order Block in the Market Maker Buy Model
In the Market Maker Buy Model, Reclaimed Order Blocks are positioned on the sell side of the market. Institutional traders accumulate buy orders in these areas, initiating an upward price movement.
These blocks represent the starting point of a bullish price trend.
Educational video on using the Reclaimed Order Block:
Reclaimed Order Block in the Market Maker Sell Model
In the Market maker-sell model, Reclaimed Order Blocks are positioned on the buy side of the market. Institutional traders gather sell orders in these areas, initiating a downward price movement.
Characteristics and Specifications of a Valid Reclaimed Order Block
A valid reclaimed order block is a zone that, after liquidity is cleared and price is reclaimed, creates a new structure with refined behavior.
This block must simultaneously meet a set of structural signals and liquidity flow conditions in order to be identified as a source of active smart money orders. The most important characteristics of a valid reclaimed order block:
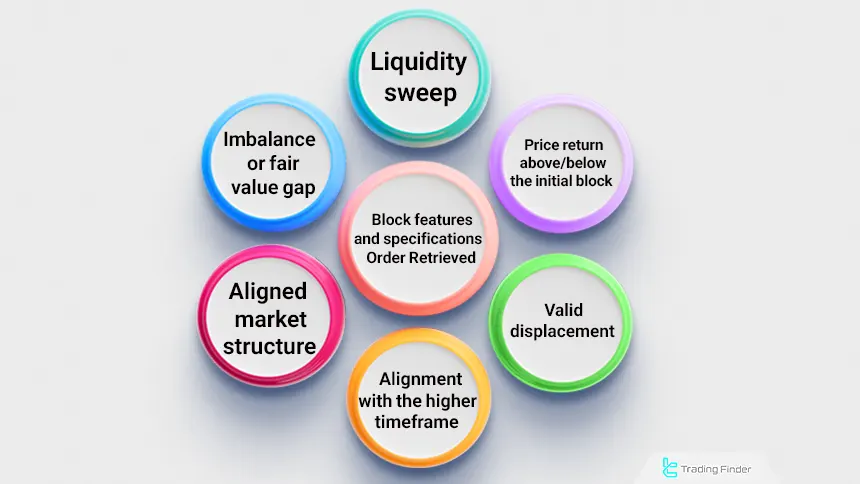
- Liquidity sweep: A clear taking of the previous high or low; removal of accumulated liquidity;
- Price return above/below the initial block: A decisive candle close in the direction of the reclaim (reclaim confirmation);
- Valid displacement: A fast and strong move after the reclaim; a sign of volume-based order flow;
- Imbalance or Fair Value Gap (FVG): The presence of a price gap as evidence of institutional liquidity entry;
- Aligned market structure: Formation of a BOS or a short-term structural shift in the direction of the new move;
- Alignment with the higher timeframe: Confluence with higher-timeframe bias and not being located in counter-trend areas.
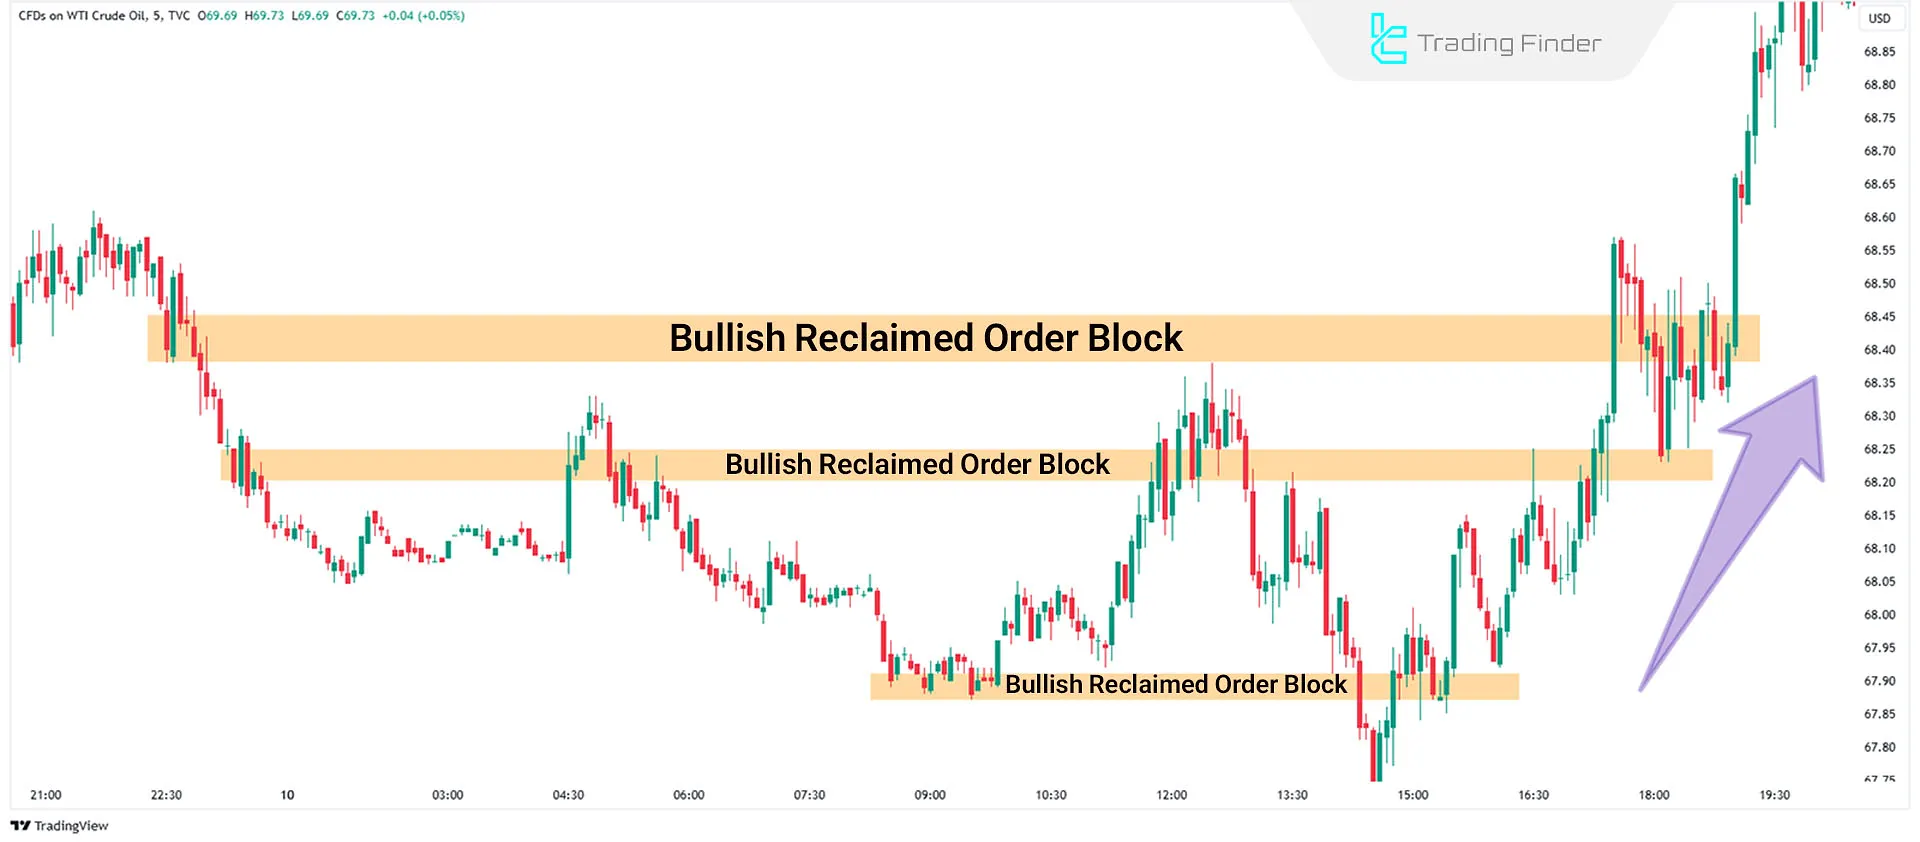
Bullish Reclaimed Order Block
A Bullish Reclaimed Order Block is a candlestick previously used for price accumulation. In this case, a minor price retracement reflects a small market displacement.
These blocks are observed in bullish markets. Before the upward movement begins, the price often dips slightly to collect liquidity and reach a key higher time frame level.
At this stage, Smart Money (large institutional traders like banks) starts buying in these zones. This gradual buying occurs due to the substantial volume of their orders, which cannot be executed simultaneously.
These buy positions are accumulated on the sell side of the market using strategic methods.
How to Trade with Bullish Reclaimed Order Blocks
On the 5-minute Bitcoin chart, when the last bearish candle closes before a small move, the price moves up on the sell side of the market.
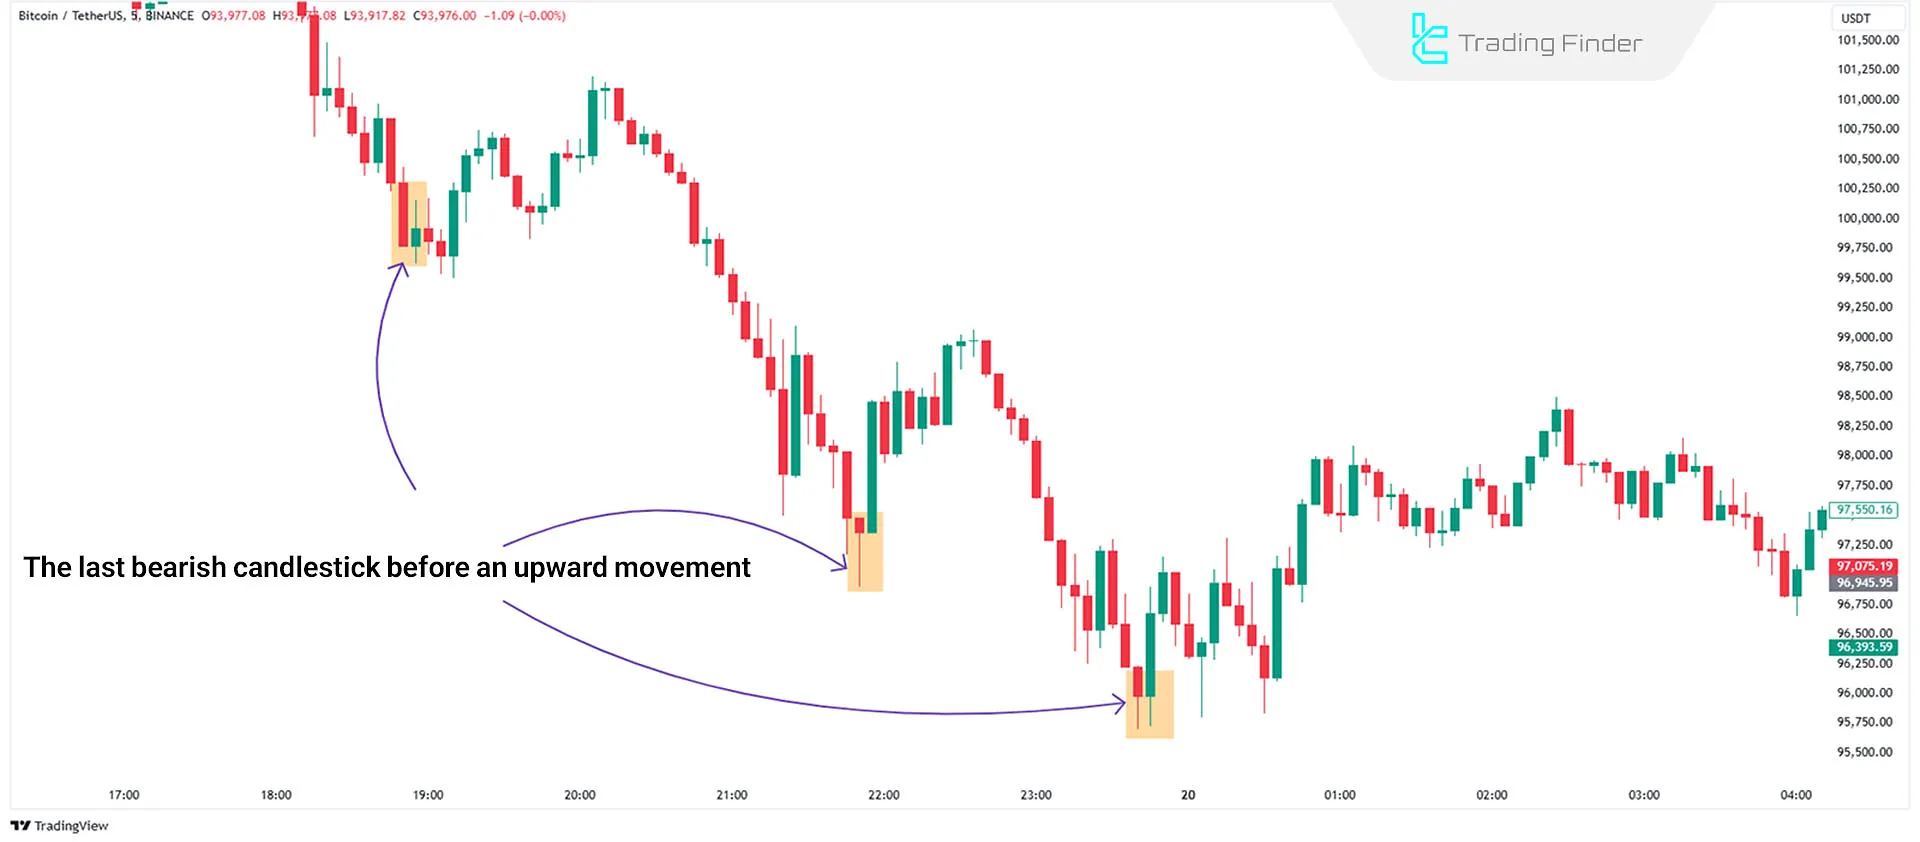
These blocks act as a support level, helping the price to continue its bullish trend.
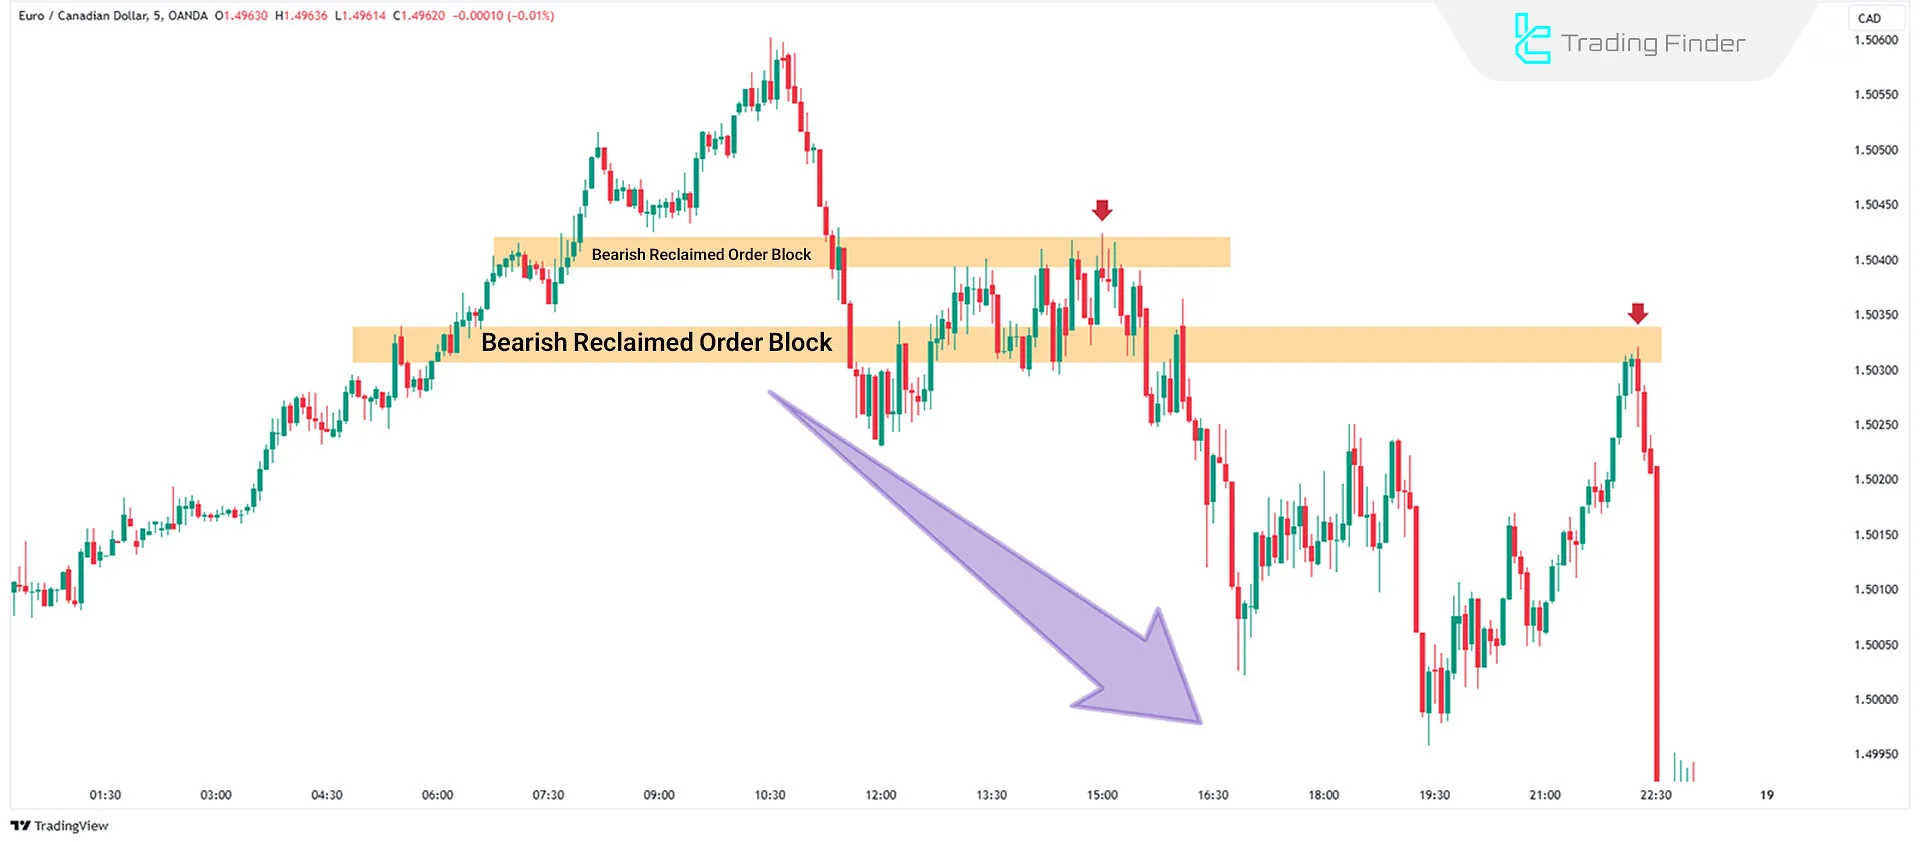
Bearish Reclaimed Order Block
A Bearish Reclaimed Order Block is a candlestick previously used for price distribution. A short-term price increase indicates a small market displacement.
These blocks are seen in the Market Maker Sell Model. Before the downward price movement begins, the price usually rises slightly to reach a higher time frame key level-the buy side of the curve.
Large institutions (e.g., banks) initiate sell positions at this stage. Due to the size of their orders, this process creates a temporary price increase, causing a minor displacement in the market.
How to Trade Bearish Reclaimed Order Blocks
A Bearish Reclaimed Order Block is the last bullish candlestick that closes before a minor displacement, followed by a price decline on the buy side of the curve.
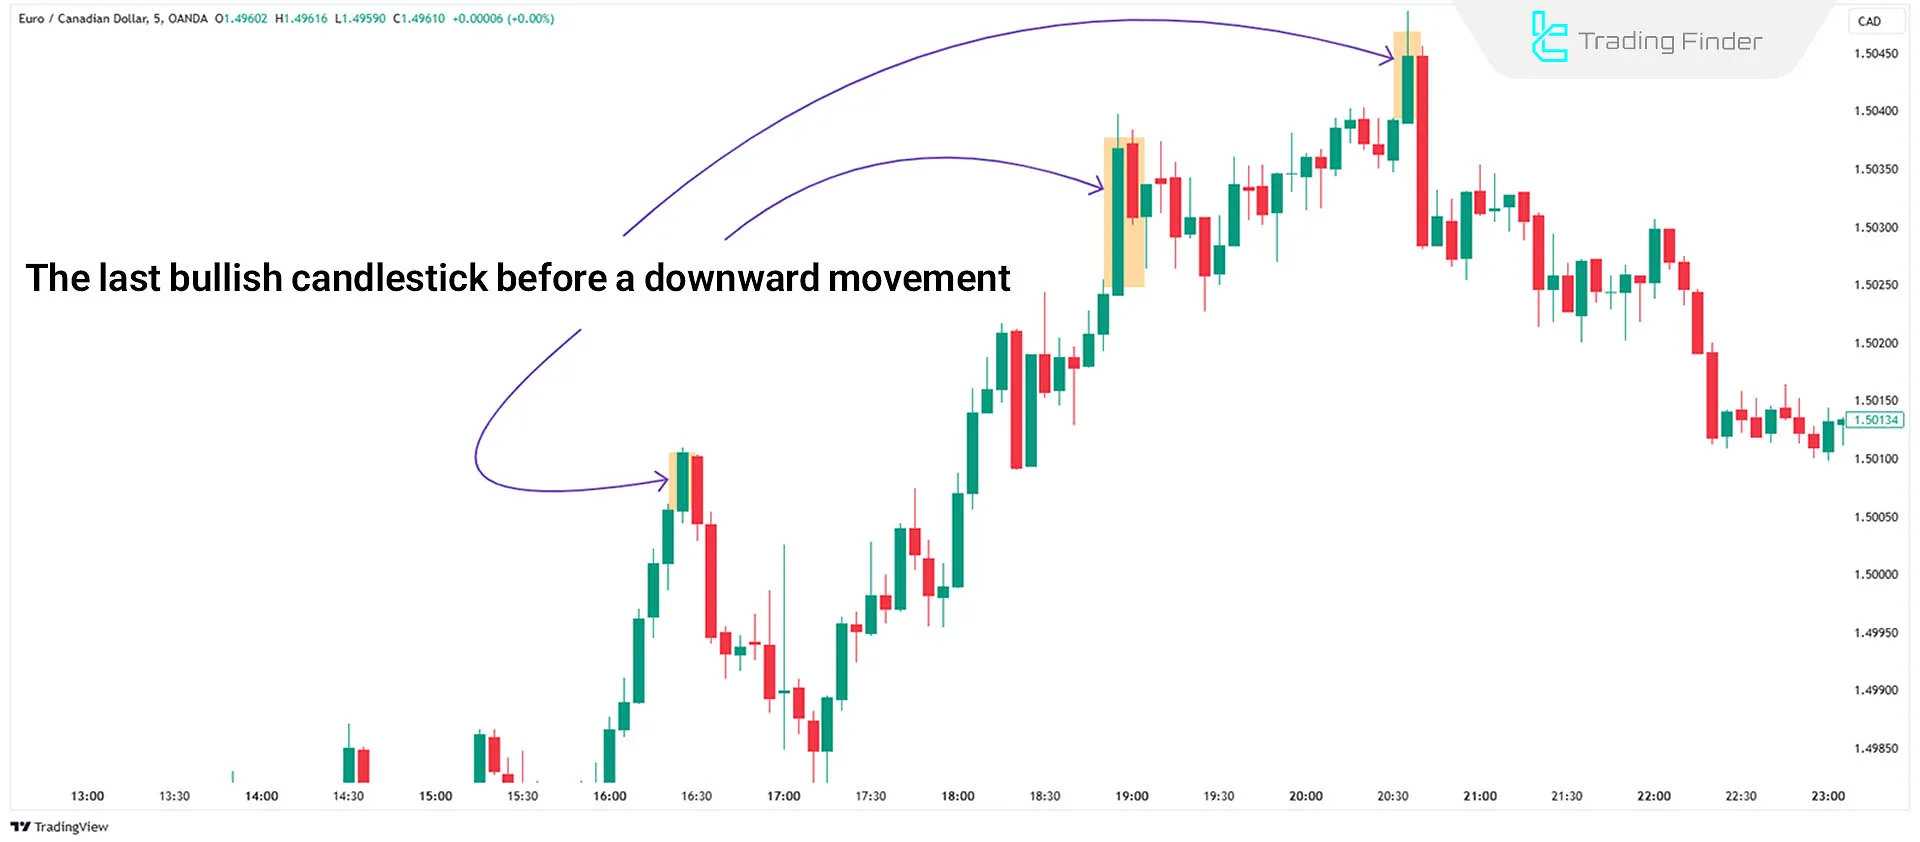
Smart Money uses these blocks on the sell side of the curve to increase their sell positions. As shown below, old blocks act as resistance, driving the price downward.
Best Timeframes for Trading with a Reclaimed Order Block (Reclaimed OB)
Choosing the timeframe in analyzing reclaimed order blocks plays a decisive role in structural accuracy and entry quality.
A valid structure forms when trend, liquidity, and order flow direction are aligned across multiple timeframes; therefore, using higher timeframes for identification and lower timeframes for entry is considered the standard approach in the ICT methodology.
Optimal timeframe combinations for using a reclaimed order block:
- HTF timeframes (1H - 4H - Daily): Main reclaimed OB zones; areas with heavy liquidity; reliable structure; identification of macro bias;
- Mid timeframes (15m - 30m): Extraction of sub-structures; BOS confirmation; identification of displacement and FVG related to the higher OB;
- LTF timeframes (1m - 5m): Finding precise entry points; initial reaction to the reclaim; preventing early entry; stop-loss reduction.
Reclaimed Order Block Indicator
The ICT Reclaimed Order Block indicator is a specialized tool for identifying order block zones based on ICT concepts and liquidity flow.
This indicator operates by focusing on market structure, price breaks, and reclaim patterns, and after the overlap of multiple zones or price reactions to specific ranges, it identifies key support and resistance levels.
Educational videos on using the reclaimed order block indicator:
Its main function is identifying the entry of smart money, confirming the trend, and providing signals at moments when market structure indicates continuation or reversal of the move.
This tool issues buy or sell signals after a Break of Structure occurs, especially when price returns to the reclaimed order block and meets required criteria such as pivot alignment or consecutive reactions.
Signals are displayed on the chart in the form of arrows with specific colors, allowing traders to identify valid opportunities more quickly.
The nature of the indicator is based on market maker models, liquidity collection, and the concept of order flow; therefore, it is more suitable for professional traders familiar with ICT structures.
This indicator falls into the category of smart money, liquidity, and multi-timeframe analysis tools and can be used across various markets including forex, stocks, and cryptocurrencies.
Its structure is compatible with intraday trading styles and performs more accurately on multiple timeframes, especially H1, M15, and M5. It also provides custom settings for traders who use 2-pivot or 5-pivot strategies.
In the settings section, parameters such as Bar Count (number of candles under analysis), Buy/Sell Side of the Curve selection, and three-point or five-point strategy selection are available. Color changes and visual display of levels can also be customized through the OppositeColor setting.
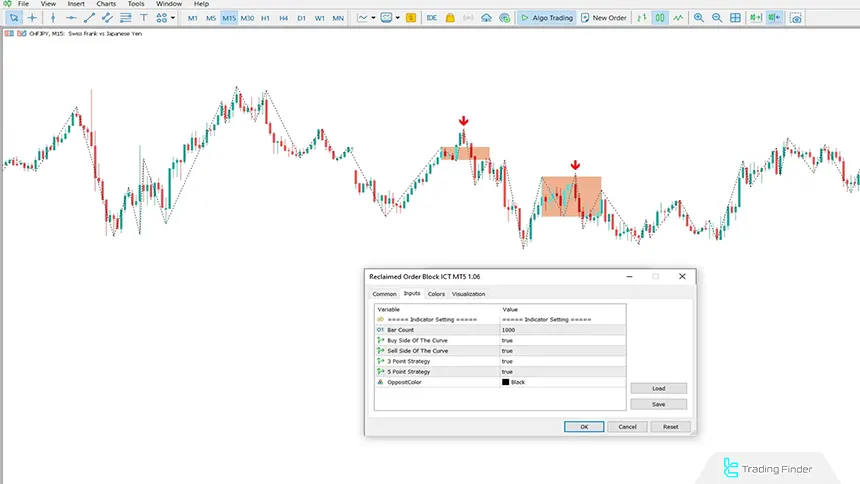
In summary, this indicator is a suitable tool for identifying reclaimed OBs and confirming trend direction after a break of structure. By relying on its signals, traders can identify potential entry points and gain more precise insight into price behavior in key zones.
Download links for the reclaimed order block indicator:
Common Mistakes in Using Reclaimed Order Blocks and ways to Prevent them
Using reclaimed order blocks only produces accurate and reliable results when the trader can correctly identify liquidity behavior, market structure, and the stages of price reclaim.
Many trading errors stem not from weakness in the concept itself, but from incorrect interpretation of sweeps, candle closes, and order flow.
Common mistakes in using the Reclaimed Order Block:
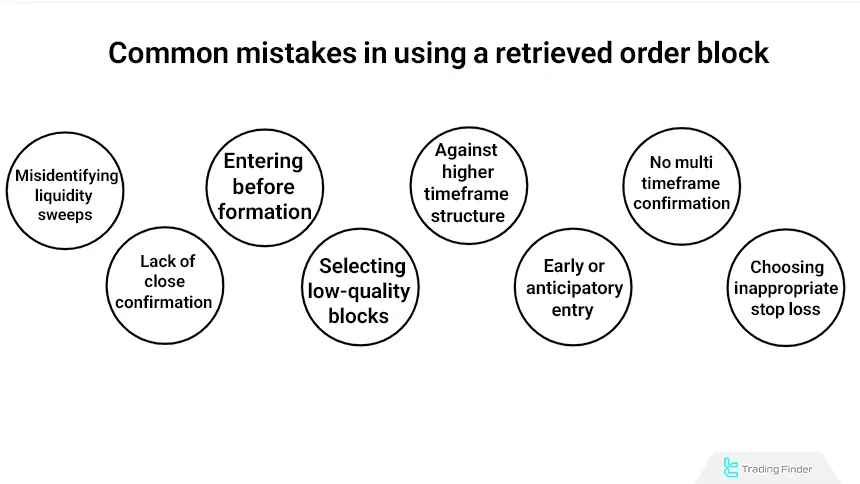
Incorrect Identification of Liquidity Sweeps
The mistake begins when a trader considers an incomplete sweep as a liquidity grab. In such cases, the previous high or low is not fully cleared, and the level assumed to be a reclaimed OB is in fact only a liquidity trap.
An incomplete sweep places the market in a deceptive state and increases the probability of fake-outs for any entry.
Prevention lies in emphasizing full liquidity removal; that is, observing a broken high or low, a pause in price after the sweep, and confirming the sweep on a higher timeframe. Only when liquidity has been fully collected can a true reclaim form.
Lack of Close Confirmation (Reclaim Confirmation)
The problem arises when a trader considers a mere touch of the level sufficient and enters a trade without a candle close above the block (bullish case) or below the block (bearish case).
A touch alone never indicates a valid reclaim, because the candle body represents real order flow, while wicks often result from random volatility.
To prevent this error, reclaim confirmation must occur through a candle body close. Break–Reclaim Close is the main criterion; meaning a break of the zone followed by a close in the expected direction. A reclaim is valid only when this decisive close is clearly visible on the chart.
Entering Before Displacement Forms
Without valid displacement, the market has not yet shown institutional order flow entry. Slow or misaligned movement indicates a lack of effective liquidity, and the reclaimed block lacks sufficient strength. Entries made without displacement are often stopped out during the first short-term correction.
Avoiding this issue requires checking for strong candle bodies, price momentum, and the presence of a directional FVG. Valid displacement means fast, directional movement with high-strength candles. Until these signs appear, entering a reclaimed OB zone is premature.
Selecting Low Quality Blocks
Insignificant, small, noisy blocks or those lacking accumulated liquidity do not have the necessary structure to qualify as a valid reclaimed OB.
These blocks form in tight ranges and low-volume environments and lack a clear structural role; therefore, price often returns without reaction.
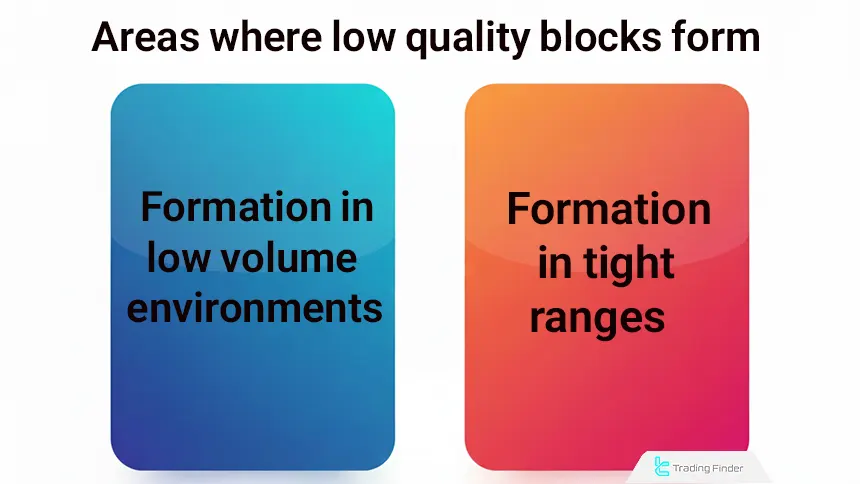
To avoid this, block selection should be based on higher timeframes. HTF blocks usually have greater liquidity behind them and provide clearer structural significance. Zones formed in small ranges without meaningful volume should not be considered reclaimed OBs.
Trading Hgainst Higher Timeframe (HTF) Structure
This error occurs when a trader relies solely on LTF signals without considering HTF bias. As a result, a level that appears valid on the LTF may actually be part of a correction or even a counter-move on the HTF. Trading against the trend usually leads to rapid failure.
Prevention requires careful analysis of Daily and H4 structures. A reclaimed OB is tradable only when its direction aligns with higher-timeframe bias. Any LTF reaction that conflicts with HTF structure should be disregarded.
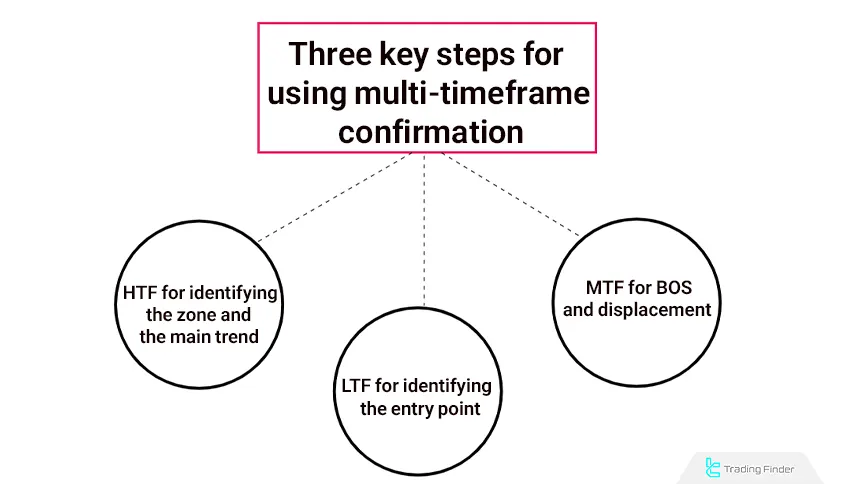
Not Using Multi Timeframe Confirmations
Ignoring alignment between HTF, MTF, and LTF structures causes a level that looks attractive on one timeframe to be completely invalid on another. This lack of coordination places entries in a low-structure-validity environment.
To prevent this, analysis must be performed in three layers: HTF to define the main zone and bias, MTF to identify aligned BOS and displacement, and LTF to capture a precise entry after the initial reaction.
Without this three-layer structure, the probability of error increases.
Early Entry and Anticipating the Reclaim
Many errors result from entering before the reclaim is complete, meaning the trader enters based only on a level touch or a brief reaction. Such behavior is often part of price manipulation and leads to early exits.
Avoiding this mistake involves waiting for the reclaim close, observing the initial LTF reaction, and confirming the entry with a micro-BOS. Entries should be based on confirmation of the new structure, not on predicting market behavior.
Improper Stop Loss Placement
Placing a stop-loss too close to the zone exposes the trade to normal LTF volatility. Many apparent failures are merely deep wicks that cause premature exits.
Prevention lies in placing the stop-loss behind the swept liquidity, evaluating LTF volatility range, and analyzing the wick zone. The stop should be placed at a level where the market maker would not naturally intend to test.
Conclusion
Reclaimed Order Blocks allow traders to identify key market zones and predict price behavior. These blocks often act as support or resistance, determining the next price direction.
For optimal execution, ICT-based time frame alignment, liquidity confirmations, and institutional-grade risk manegment are crucial in validating trade setups.


